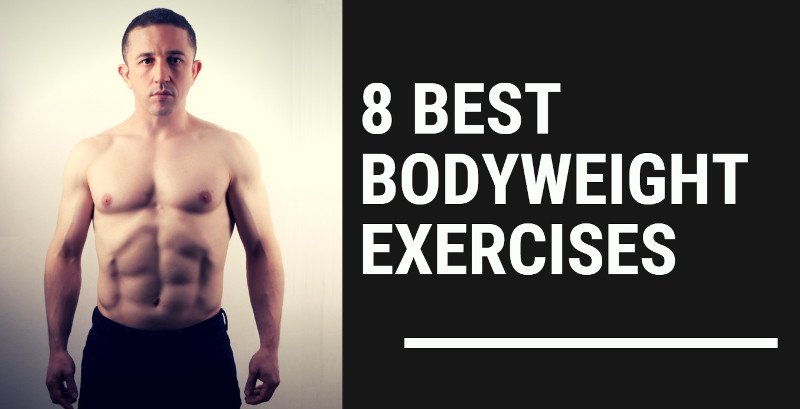
This article is an excerpt from my book, Ripped with Bodyweight – 12 Week Program for Muscle Growth and Fat Loss.
I built a ripped physique with six-pack abs by doing 8 simple bodyweight exercises over and over again.
These exercises are simple yet extremely powerful. They are the only bodyweight exercises you’ll ever need to build a ripped, muscular, and athletic body with six-pack abs.
All 8 of them are compound exercises where you work more than one muscle group at the same time, which will give you the most bang for your buck.
Here are the 8 exercises and the muscles they work:
- Burpee (abs, triceps, obliques, shoulders, chest, quads, glutes, hamstrings, calves, the adonis belt)
- Pull-up (back, shoulders, biceps, forearms)
- Push-up (chest, shoulders, triceps, abs, anterior)
- Sit-up (abs, obliques, tensors, thighs)
- Squat (hamstrings, quadriceps, glutes, adductors, calves, abs)
- Leg raise (abs, thighs, obliques)
- Lunge (quadriceps, hamstrings, glutes, calves, abs, back)
- Jump (quadriceps, hip flexors, hamstrings, calves)
These 8 exercises are all the bodyweight exercises you will ever need to build muscle, burn fat and get ripped at home without weights. The only exercise that requires equipment is the pull-up. A simple pull-up bar that you set up at home will be more than enough. The rest of the exercises require no equipment.
Photo tutorials for the proper and easy versions of each exercise including the explanations and tips are included below, under the headlines for each exercise.
It’s best to perform all the exercises in full, proper form but do not be discouraged if you can’t perform an exercise in its full, proper form, yet. If that’s the case, start by doing the easier version of the exercise that you are currently unable to perform, which I think anybody can achieve regardless of their current shape. Doing the easier version of any exercise will build up strength and you will soon be able to perform the full version.
1. BURPEE
The burpee is the king of all bodyweight exercises because it works the largest groups of your muscles at once. With each rep of burpees, you train your abs, triceps, obliques, shoulders, chest, quads, glutes, hamstrings, calves and the adonis belt.
Burpees also boost your cardiovascular capacity because when you work most of your muscles in your body at once, they will need oxygen. You will notice that you will start to breathe heavily after a few reps of burpees. That’s completely normal so don’t freak out.
Burpees not only build your muscles and boost your cardiovascular capacity but also improve your mental strength. No matter how well-trained you are, burpees will become difficult to do after a few reps. You will have to employ your mental powers to keep on doing burpees until you reach your target rep count.
This mental and physical effort will not be in vain though, because you will notice that after a few weeks of doing burpees regularly, your muscles will improve noticeably and you will feel a lot more athletic compared to just a few weeks before. Burpees are extremely rewarding in this regard and the benefits don’t end there. Burpees burn calories which will make it easier to shed pounds of fat off your body.
HOW TO DO A BURPEE WITH THE PROPER FORM
A proper burpee is the one with the push-up movement included.
- Start with a standing position with your feet shoulder-width apart.
- Squat and place your hands in front of you on the floor.
- Shoot your feet back and get into a push-up position.
- Do a push-up. Your chest briefly touches the ground.
- Push your feet back to their original position.
- Jump into the air and clap your arms over your head.
- Repeat.
BURPEE PROPER FORM IN PICTURES
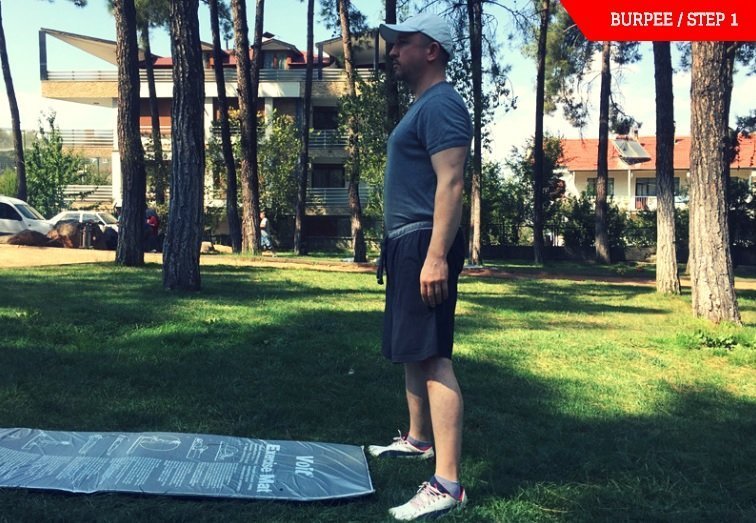
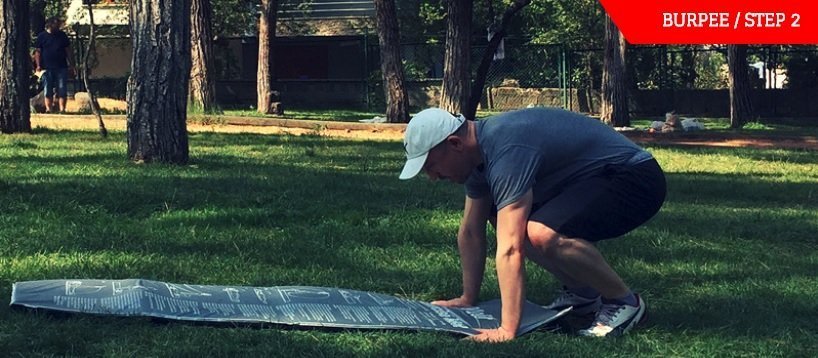
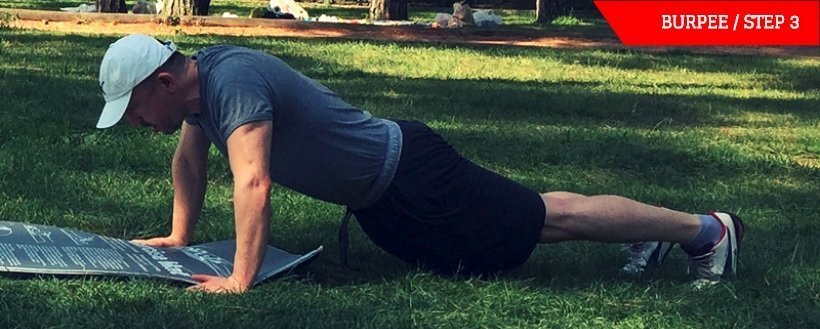
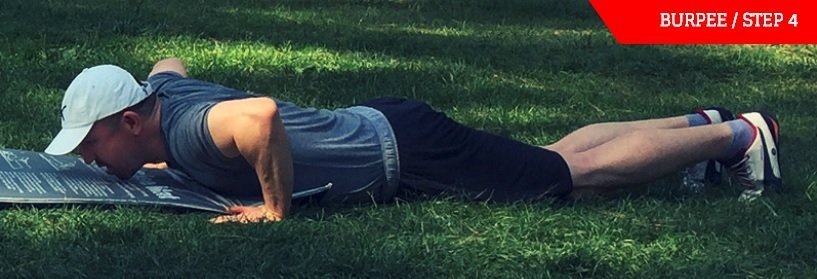
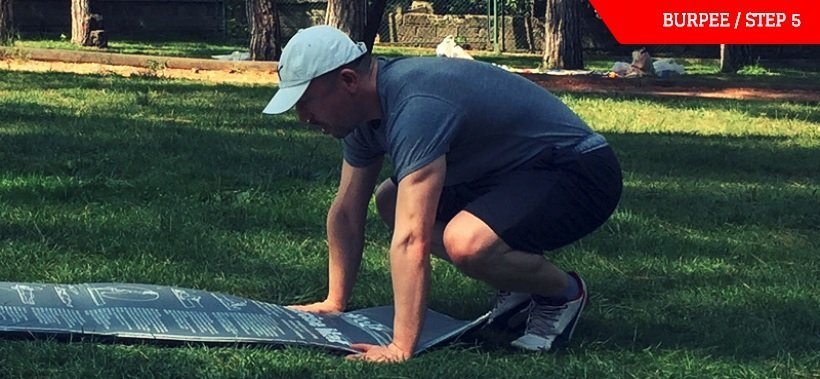
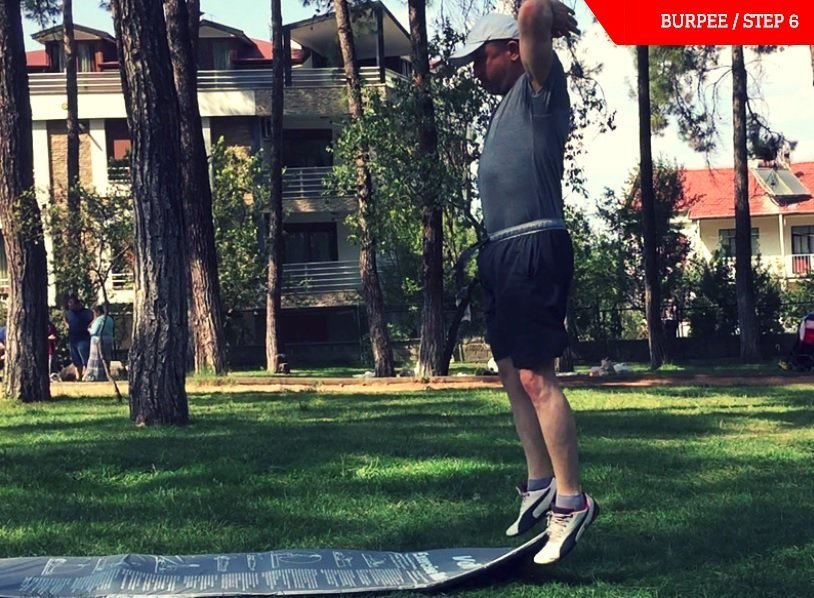
THE EASY VERSION OF THE BURPEE (MODIFIED BURPEE)
The easy version of the burpee is the one without the push-up movement.
- Start with a standing position with your feet shoulder-width apart.
- Squat and place your hands in front of you on the floor.
- Shoot your feet back and get into a push-up position.
- Push your feet back to their original position.
- Jump into the air and clap your arms over your head.
- Repeat.
MODIFIED BURPEE IN PICTURES
The modified burpee is the proper burpee without the push-up part. Refer to the proper burpee pictures above and skip step 4.
2. PULL-UP
The pull-up is one of the most challenging but also one of the most rewarding muscle-building exercises.
A person who can do a proper pull-up is considered to be fit. Most people can’t do a single proper pull-up if their lives depended on it.
If you can’t do a proper pull-up, don’t fret. Do the easier version until you build enough strength to perform a proper pull-up.
When you look around the internet or watch other people train, you will notice that the pull-up has various versions. Some people do it with an overhand grip, others do it with an underhand grip (chin-ups), and a few others do it with a neutral grip. Some people do it with a wide grip (thinking that it will build them a wider back), and others do it with a close grip.
To understand which combination of the grip styles produces the best results, we must understand the purpose of pull-ups.
Pull-ups are meant to target your back muscles. Doing pull-ups is a great way to build a big, muscular, and wide back. Pull-ups work your arms and shoulders too but the main point of doing pull-ups is to train your back. There’s nothing wrong with training your shoulders and arms but there are other exercises to train them better. When you do pull-ups, your aim is to develop your back muscles.
The problem with gripping the bar overhand, underhand or wide is that you put too much pressure on your arms and shoulders. For example, when you perform a chin-up (the one with the underhand grip), you will put too much pressure on your biceps, which is a small muscle group. After a few reps, your biceps will start to fatigue and you will have to quit before your back muscles are properly trained. Doing pull-ups with an overhand grip is better but your arm muscles will still get fatigued before your back muscles.
There is a similar problem with wide-grip pull-ups. When you grip the bar wide while doing pull-ups, your arms are doing most of the work. Again, your arm muscles will give up before you properly work your back muscles.
The best grip for pull-ups is the grip that puts the least strain on your arms. That grip is the neutral, close grip.
So, whenever your training session requires you to do pull-ups, it means that you are better off if you perform neutral, close grip pull-ups. That’s the best type of grip to build a bigger and wider back. Don’t skip the pull-ups though if your pull-up bar doesn’t allow you to grip the bar neutrally. In that case, do overhand, close grip pull-ups.
HOW TO DO A PULL-UP WITH THE PROPER FORM
- Start with a standing position.
- Grab the bar and grip it (preferably neutral with a narrow grip, if not, overhand with shoulder-width grip).
- Get your feet off the floor and lock your arms out.
- Pull yourself up and get your chin above the bar.
- Get back down to your initial gripping position.
- Repeat from step 2.
PULL-UP PROPER FORM IN PICTURES
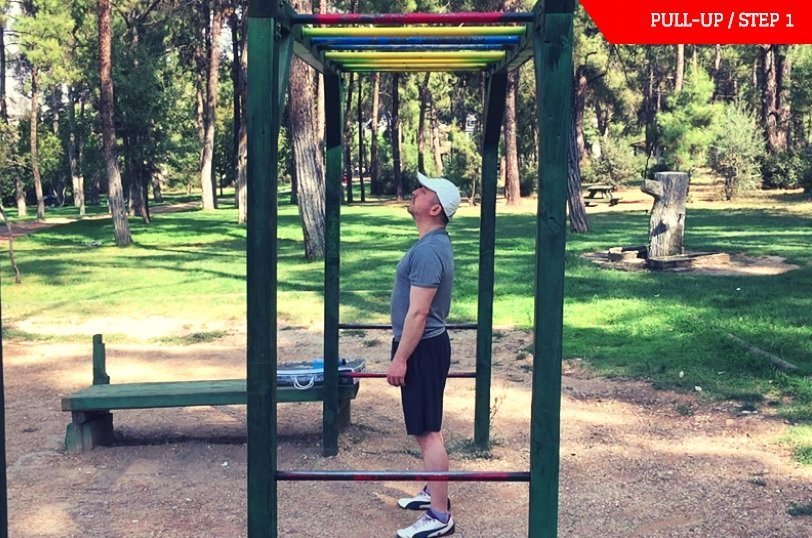
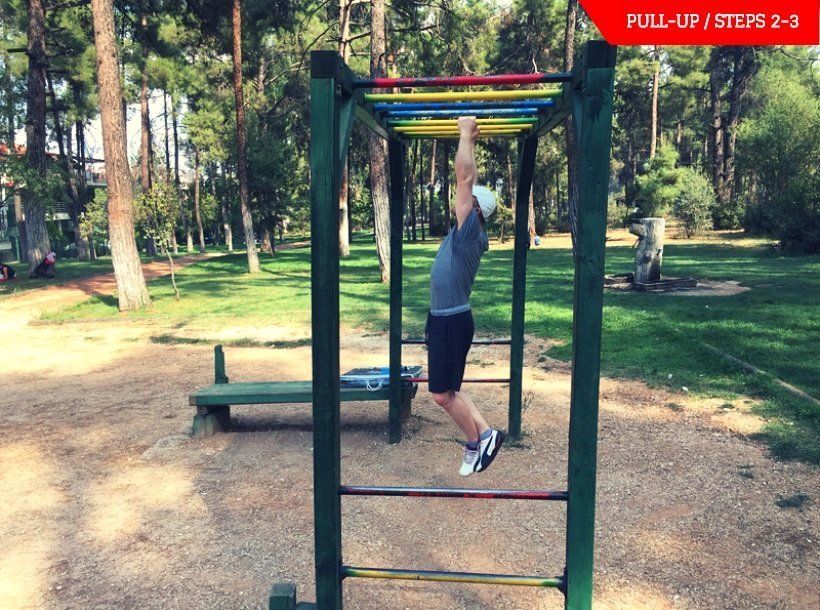
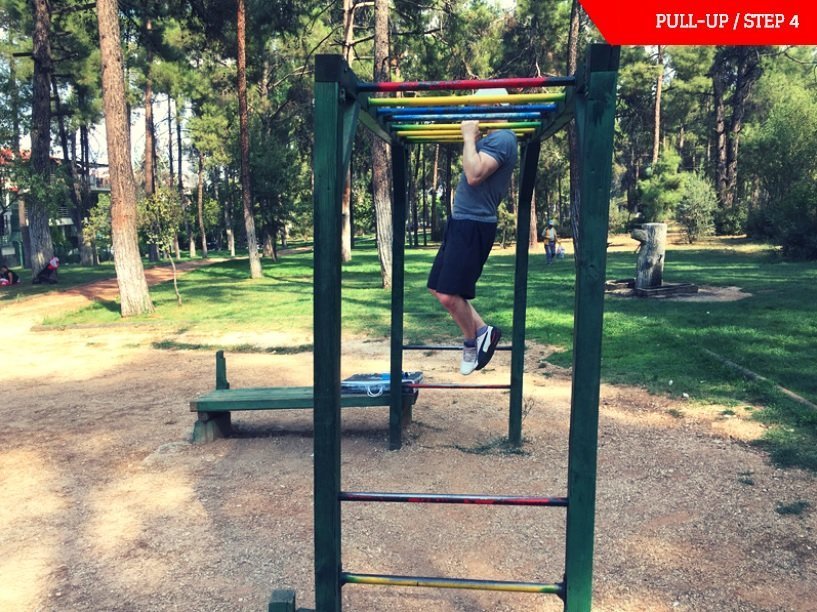
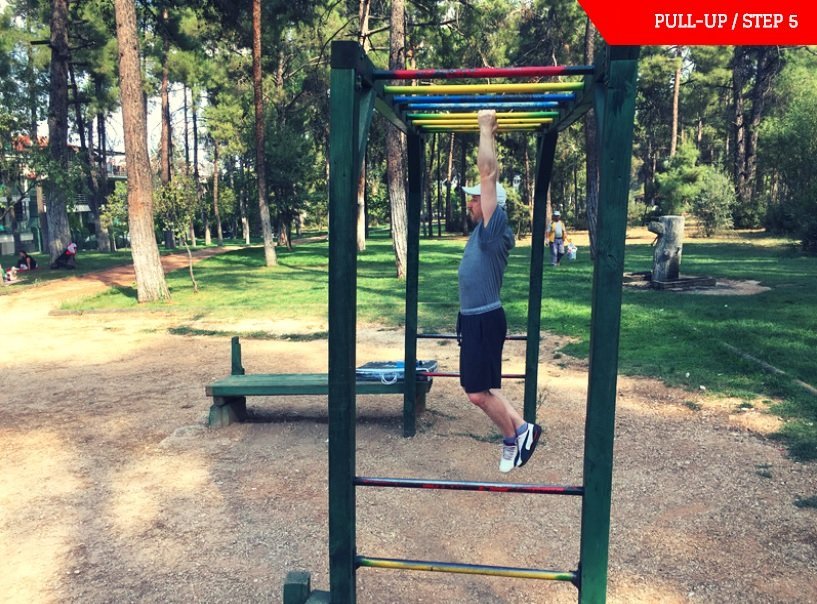
Repeat from step 2.
THE EASY VERSION OF THE PULL-UP (NEGATIVE PULL-UP)
The difficult part of the pull-up is the part where you pull yourself up. If you can’t pull yourself up (yet), don’t be frustrated. Skip the pulling yourself up part of the pull-up and concentrate on the part where you are lowering yourself down.
- Grab the bar with your feet on the floor and grip it (preferably neutral with a narrow grip, if not, overhand with shoulder-width grip).
- Jump up to get your chin above the bar.
- Lower yourself slowly and in control until you get back down to your initial gripping position.
- Repeat from step 2.
Doing negative pull-ups is a great way to strengthen your back muscles. When you build up enough strength by doing negative-pullups for a while, you will be able to do a regular pull-up.
Another thing you can do to improve your pull-ups is to lose fat. If you have extra pounds of fat in your body, it will be harder for you to pull yourself up as you will have to lift more weight. When you slim down, you increase your chances to do a proper pull-up, and later increase the number of pull-ups you can do.
NEGATIVE PULL-UP IN PICTURES
You can refer to the pictures of the proper pull-up for the negative pull-up form. While doing negative pull-ups you don’t pull yourself up but jump from the ground until your chin is above the bar and you lower yourself slowly and in control until you get back down to your initial gripping position. This motion counts as one rep.
3. PUSH-UP
The push-up is another great bodyweight exercise which mainly targets your chest muscles. Since it’s a compound exercise, you will train your arms and shoulders as well.
There are many versions of push-ups to target different groups of muscles but you will only do the good-old regular push-ups for the sake of simplicity and efficiency.
Performing a proper push-up is easier than performing burpees or pull-ups but they still can be challenging. If you can’t do a regular push-up, there’s no shame in performing the easier version until you build enough strength to do them with the proper form.
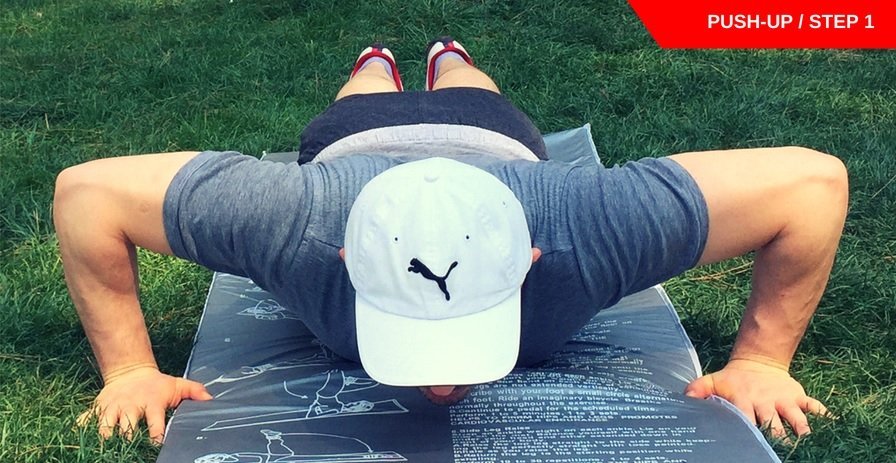
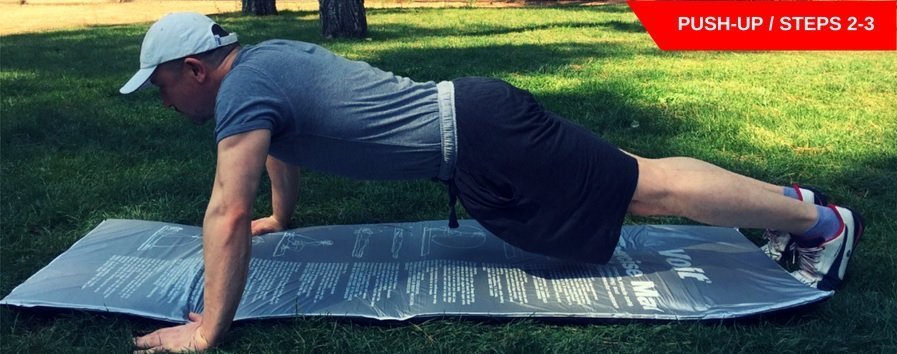
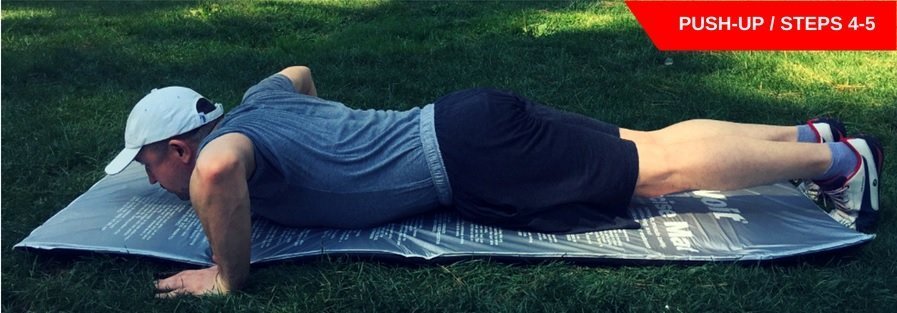
HOW TO DO A PUSH-UP WITH THE PROPER FORM
- Start with the prone position where you lie flat with your chest down, back up. Your feet should be shoulder width apart and your hands should be placed wider than shoulder-width apart, touching the ground.
- Push yourself up and rise on the tip of your feet while your chest, hips, and legs leave the ground.
- Go up until your arms are straight.
- Go back down to your starting position.
- Repeat.
PUSH-UP PROPER FORM IN PICTURES
THE EASY VERSION OF THE PUSH-UP (MODIFIED PUSH-UP)
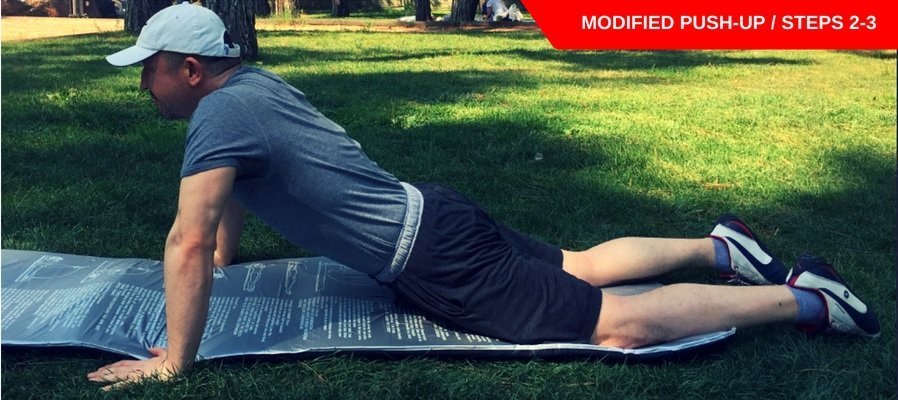
- Start with the prone position where you lie flat with your chest down, back up. Your feet should be shoulder width apart and your hands should be placed slightly wider than shoulder-width apart, touching the ground.
- Push yourself up and rise on your knees while your chest and hips and leave the ground.
- Go up until your arms are straight.
- Go back down to your starting position.
- Repeat.
Doing modified push-ups is a great way to strengthen your chest muscles. When you build up enough strength by doing modified push-ups for a while, you will be able to do a regular push-up. Other exercises will also strengthen your core which will help you with your push-ups. Just like pull-ups, it’s always a good idea to lose the extra pounds of fat in your body to increase the number of regular pull-ups you do.
MODIFIED PUSH-UP IN PICTURES
The starting position for the modified push-up is the same as the regular push-up.

4. SIT-UP
The sit-up is one of the most commonly performed bodyweight exercises which mainly works your ab muscles. It’s a great exercise to strengthen your core, which will help you to perform any other strength training exercise better.
While sit-ups are too popular, many people do them wrong. Here’s how to perform a proper sit-up:
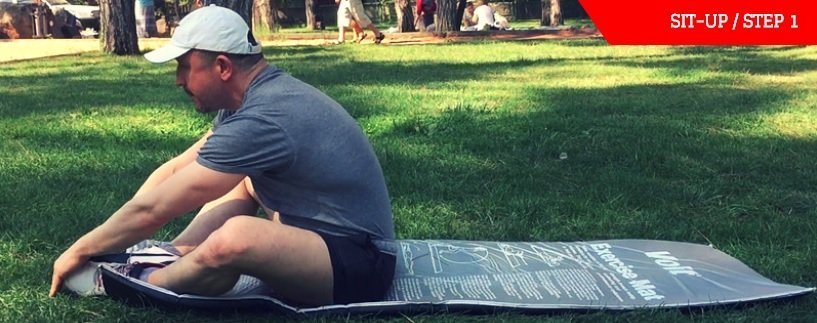
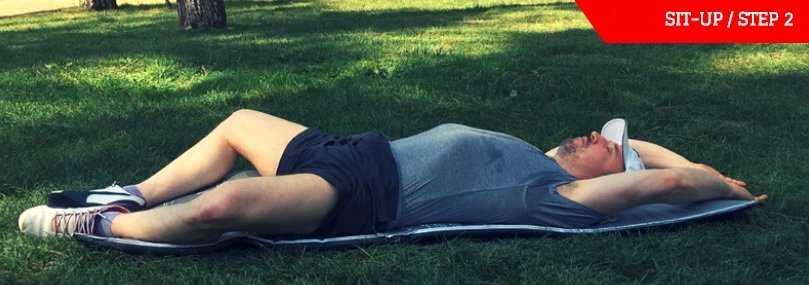
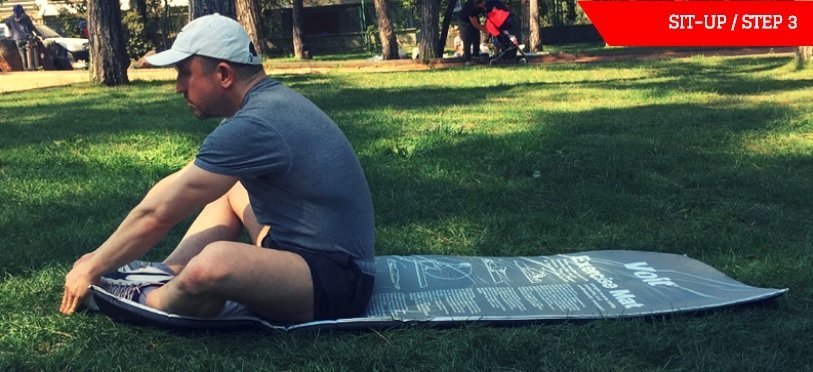
HOW TO DO A SIT-UP WITH THE PROPER FORM
- Start with a sitting position where your glutes and feet are touching the ground and your feet touching each other. Your hands touch the ground in front of your feet.
- Swing with arms while you move your body back until your hands touch the ground behind your head and your back touches the ground.
- Sit-up with a forward motion with your hands swinging forward until you touch back to the ground in front of your feet.
- Repeat from step 2.
While sit-ups aren’t as challenging as burpees, pull-ups, or push-ups, you can still have trouble performing them properly, especially when the fatigue kicks in during your training sessions. When you find yourself in such a situation, switch to the easy version of sit-ups.
SIT-UP PROPER FORM IN PICTURES
THE EASY VERSION OF THE SIT-UP (MODIFIED SIT-UP)
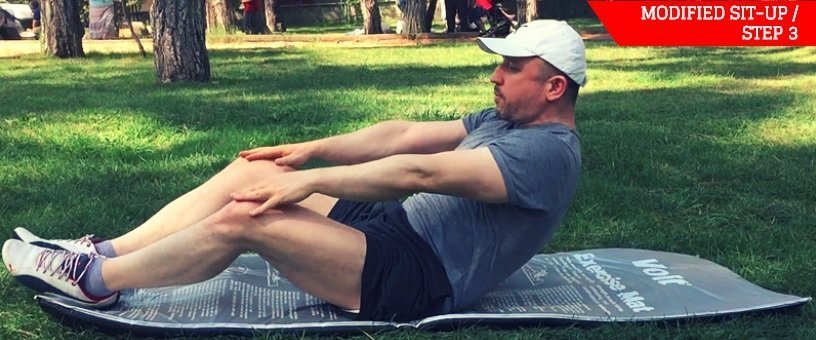
- Start with a sitting position where your glutes and feet are touching the ground and your feet touching each other. Your hands touch the ground in front of your feet.
- Swing with arms while you move your body back until your hands touch the ground behind your head and your back touches the ground.
- Sit-up with a forward motion with your hands swinging forward until you touch your knees with the tip of your hands.
- Repeat from step 2.
MODIFIED SIT-UP IN PICTURES
Steps 1 and 2 are the same as the proper sit-up. On step 3, you only sit up until your hands reach your knees.
5. SQUAT
The bodyweight squat is a great exercise to train your legs. Since it’s a compound movement you also get to train your glutes, adductors, and abs.
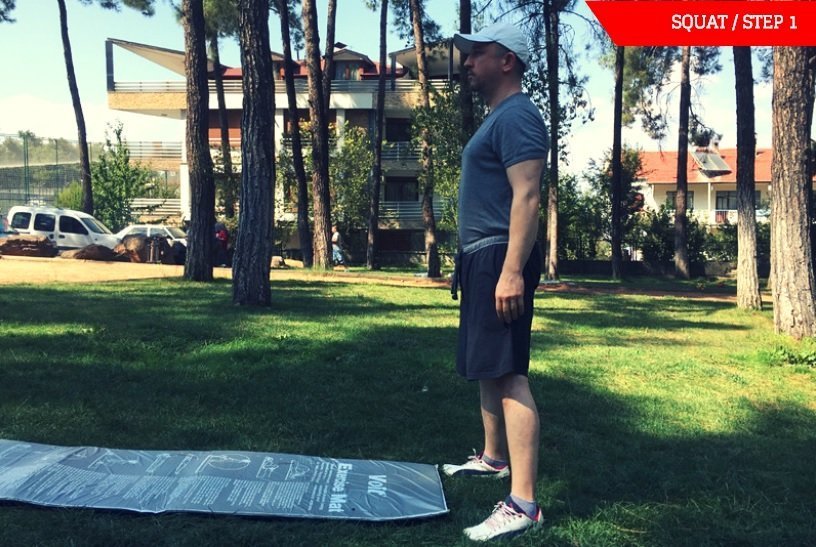
HOW TO DO A SQUAT WITH THE PROPER FORM
- Start with a standing position with your heels shoulder-width apart. Your feet should be pointing slightly outwards. Your shoulders, hips, knees, and heels must be in a line.
- Start squatting down by pushing your knees out and keeping your lower back tight. Your knees must NOT bend inwards. They should be bending outwards. Your shoulders and heels must always be in a line during the whole of the movement. Give your weight to your heels.
- Squat down until your hips are at least parallel to the ground. Go slightly deeper below your knees if you have the flexibility but parallel is ok.
- Stand up to return to your starting position.
- Repeat.
When you find yourself in a position that you can’t perform a proper squat due to fatigue or lack of flexibility, proceed with your training by doing the easy version.
SQUAT PROPER FORM IN PICTURES
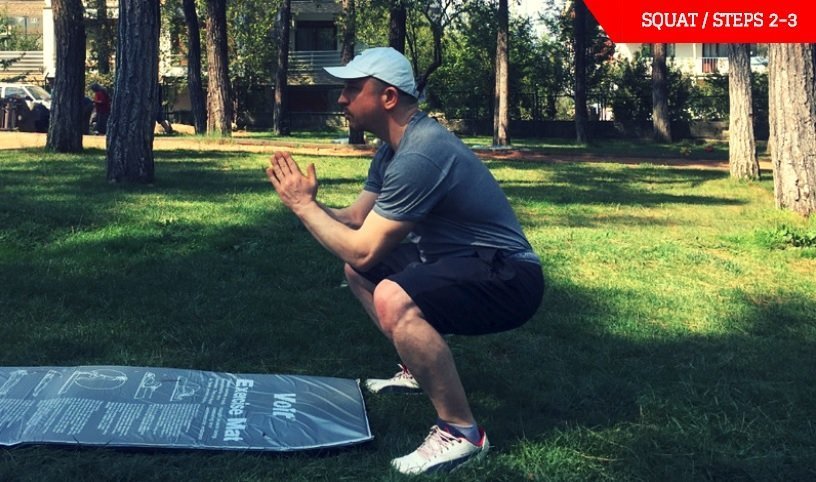
Stand up to your starting position and repeat.
THE EASY VERSION OF THE SQUAT (MODIFIED SQUAT)
- Start with a standing position with your heels shoulder-width apart. Your feet should be pointing slightly outwards. Your shoulders, hips, knees, and heels must be in a line
- Start squatting down by pushing your knees out and keeping your lower back tight. Your knees must NOT bend inwards. They should be bending outwards. Your shoulders and heels must always be in a line throughout the movement. Give your weight to your heels.
- Squat down as deep as you can go.
- Stand up to return to your starting position.
- Repeat.
MODIFIED SQUAT IN PICTURES
Modified squat step 3 is different from the regular squat, other steps are the same.
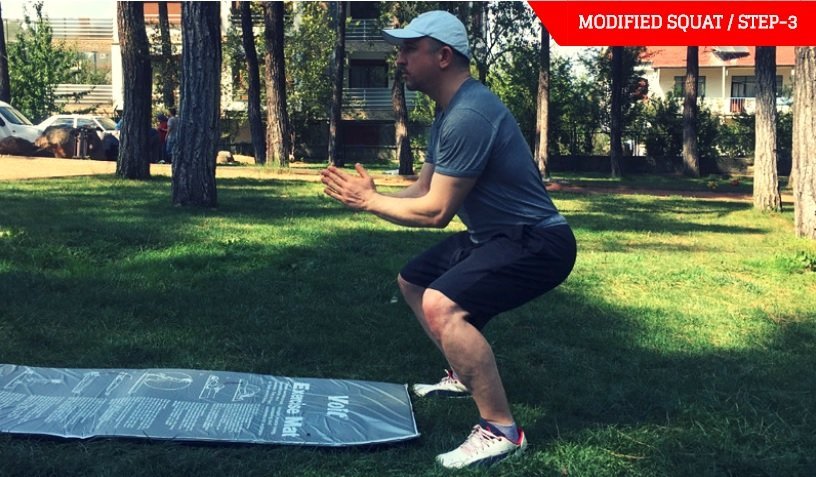
6. LEG RAISE
Leg raise is a great exercise to work your abs (especially the lower parts of your abdomens) and the stabilizing muscles around your core. It also works your thighs and obliques.
HOW TO DO A LEG RAISE WITH THE PROPER FORM
- Start with the supine position where you lie flat with your back down, chest up. Place your hands lying flat on the ground next to your body. Your feet should contact and your legs should be straight at all times.
- Press your lower back on the ground and lift your legs up until they are vertical to the ground.
- Get your legs and feet back to the starting position.
- Repeat from step 2.
After doing a certain number of reps with leg raises or when your legs lack the flexibility to raise your legs up until they are vertical to the ground, you can do the easy version of the leg raises.
LEG RAISE PROPER FORM IN PICTURES
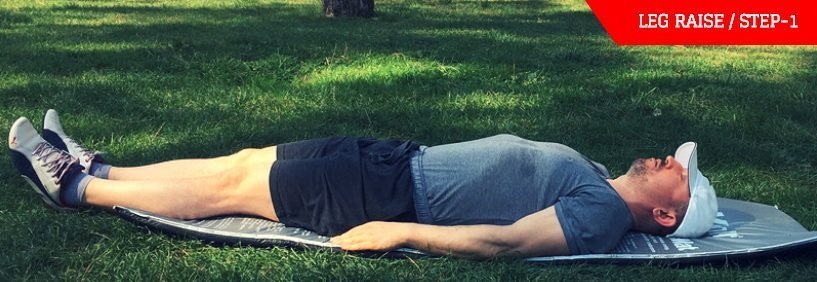
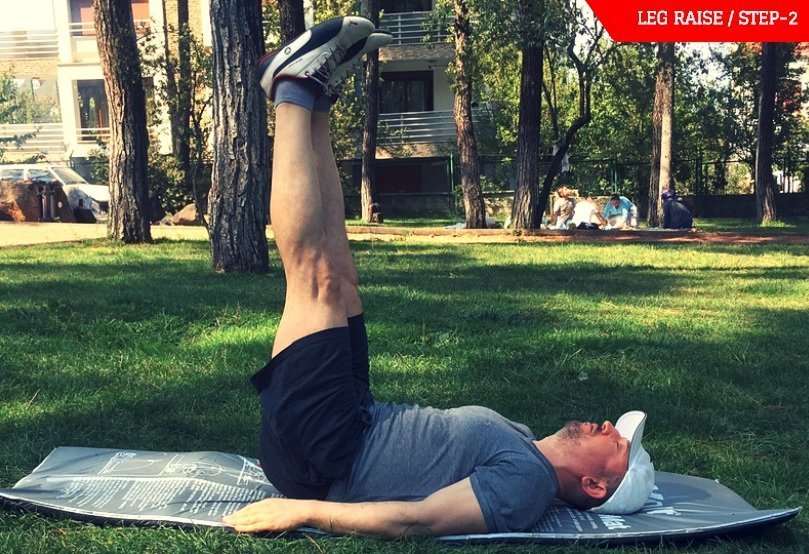
Get your legs and feet back to the position at step 1 and repeat.
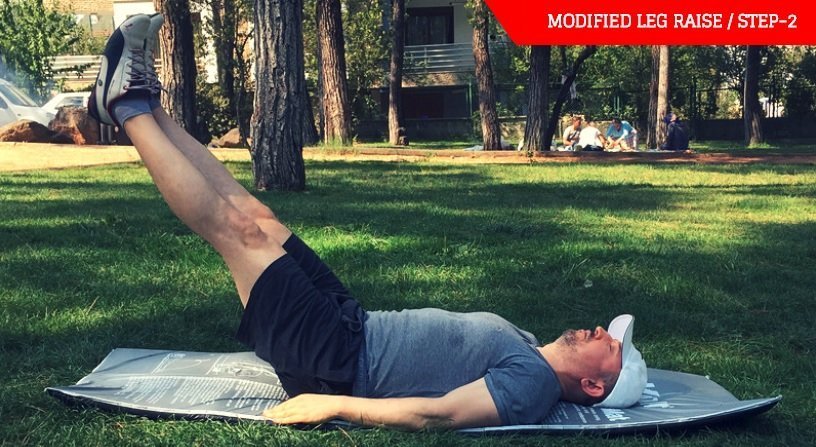
THE EASY VERSION OF THE LEG RAISE (MODIFIED LEG RAISE)
- Start with the supine position where you lie flat with your back down, chest up. Place your hands lying flat on the ground next to your body. Your feet should contact and your legs should be straight at all times.
- Press your lower back on the ground and lift your legs up as high as you can.
- Get your legs and feet back to the starting position.
- Repeat from step 2.
MODIFIED LEG RAISE IN PICTURES
Only step-2 of the modified leg raise is different from the proper leg raise:
7. LUNGE
The lunge is a great exercise to train your quadriceps muscles and the stabilizer muscles around them. They also work your hamstrings, glutes, calves, abs, and back.
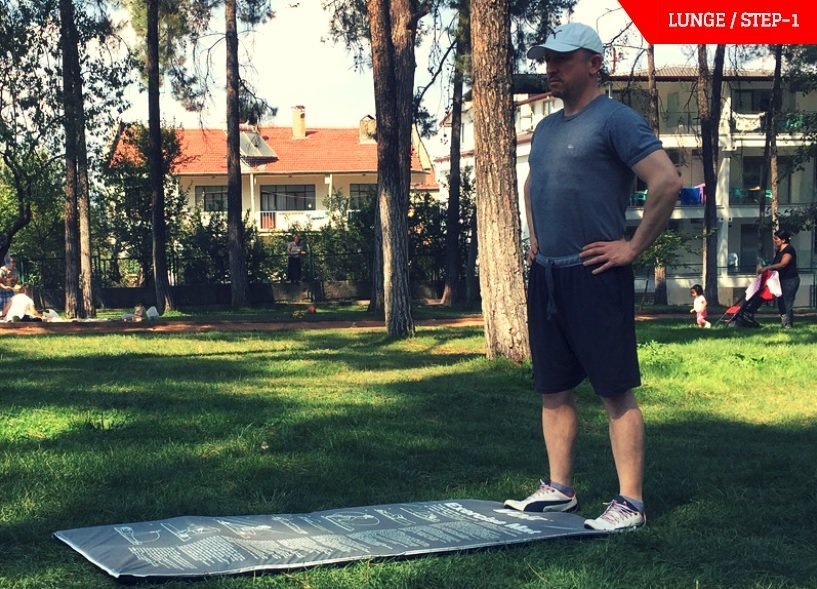
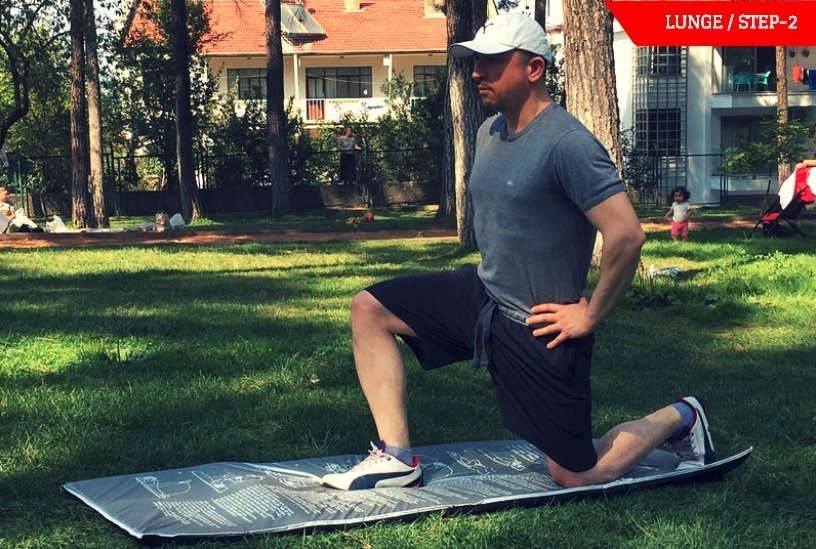
HOW TO DO A LUNGE WITH THE PROPER FORM
- Start with a standing position with your feet shoulder-width apart and your palms resting over your hips. Your shoulders, hips, knees, and heels should be in a line. Your hands should be on your hips during the whole movement.
- Lunge forward with one of your legs until your knee touches the ground while keeping your back and thigh vertical to the ground.
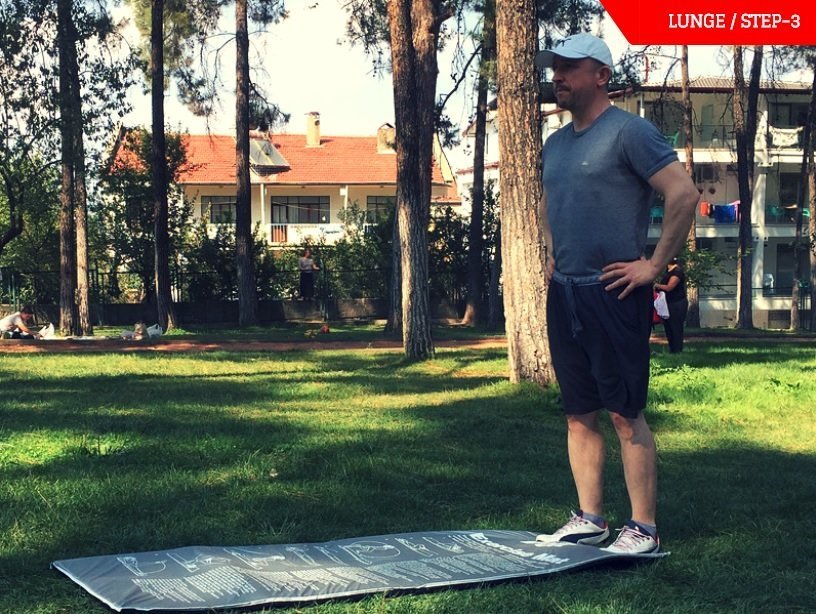
- Get back up to the starting position.
- Lunge forward with your other leg until your knee touches the ground while keeping your back and thigh vertical to the ground.
- Get back up to the starting position.
- Repeat with the other leg and vice versa.
Each leg counts as a rep.
If your quadriceps or stabilizer muscles aren’t strong enough (yet) or you get fatigued during your workout that you can’t do the lunges with the proper form, you can proceed with your training by doing the easier version.
LUNGE PROPER FORM IN PICTURES
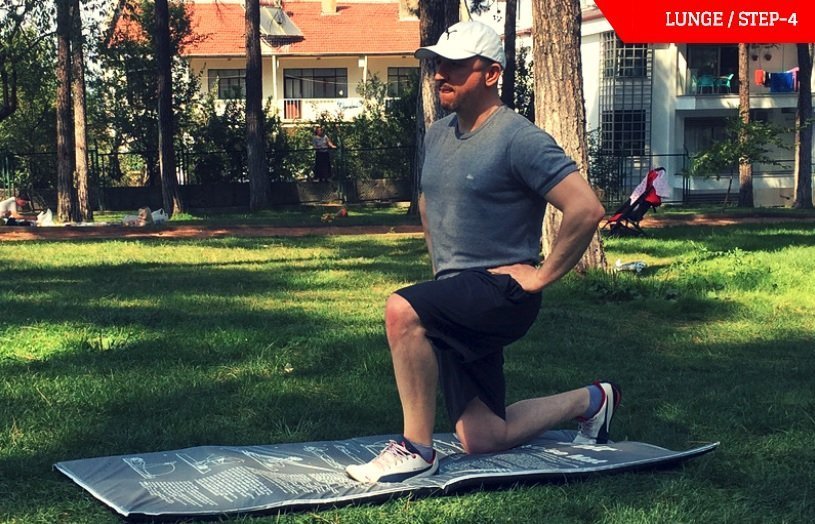
Get back to the starting position and repeat with the other leg as pictured in steps 1 and 2.
THE EASY VERSION OF THE LUNGE (MODIFIED LUNGE)
- Start with a standing position with your feet shoulder-width apart and your palms resting over your hips. Your shoulders, hips, knees, and heels should be in a line.
- Lunge forward with one of your legs until your knee touches the ground while keeping your back and thigh vertical to the ground.
- Get back up to the starting position with the help of your hand supporting your leg.
- Lunge forward with your other leg until your knee touches the ground while keeping your back and thigh vertical to the ground.
- Get back up to the starting position with the help of your hand supporting your leg.
- Repeat with the other leg and vice versa.
Each leg counts as a rep.
MODIFIED LUNGE IN PICTURES
During modified lunges, you use your hands to help you with the movement when you are lunging forward and getting back up. Starting position is the same.
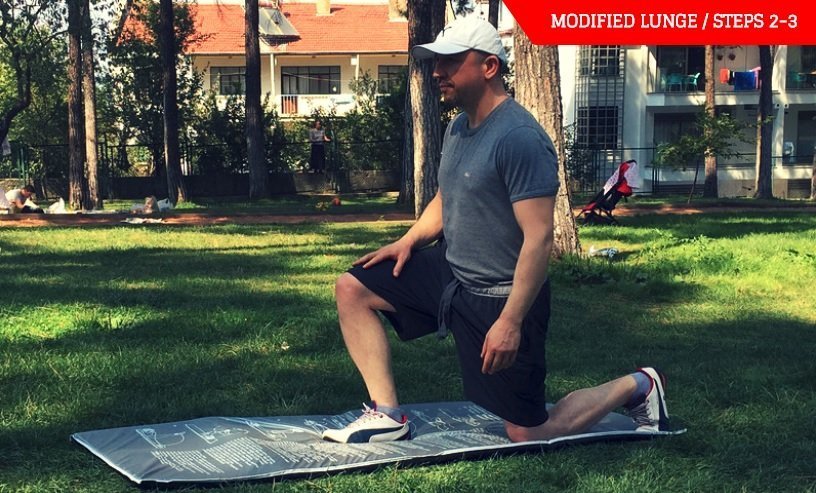
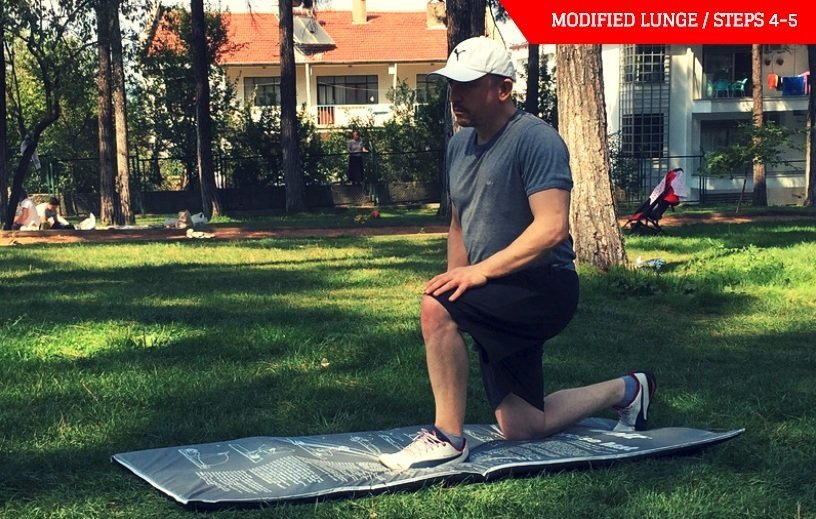
8. JUMP
Jump is a great exercise to work your legs and cardiovascular system. It’s also a great way to train your hip flexors.
HOW TO DO A JUMP WITH THE PROPER FORM
- Start with a standing position with your feet shoulder-width apart
- Jump with both feet at the same time
- Raise your knees up until the hip level or higher. Be careful not to turn your knees in.
- Land on your feet to get back to the starting position.
- Repeat.
If you find yourself too fatigued to jump up to the hip level or you lack the flexibility, proceed with the easier version.
JUMP PROPER FORM IN PICTURES
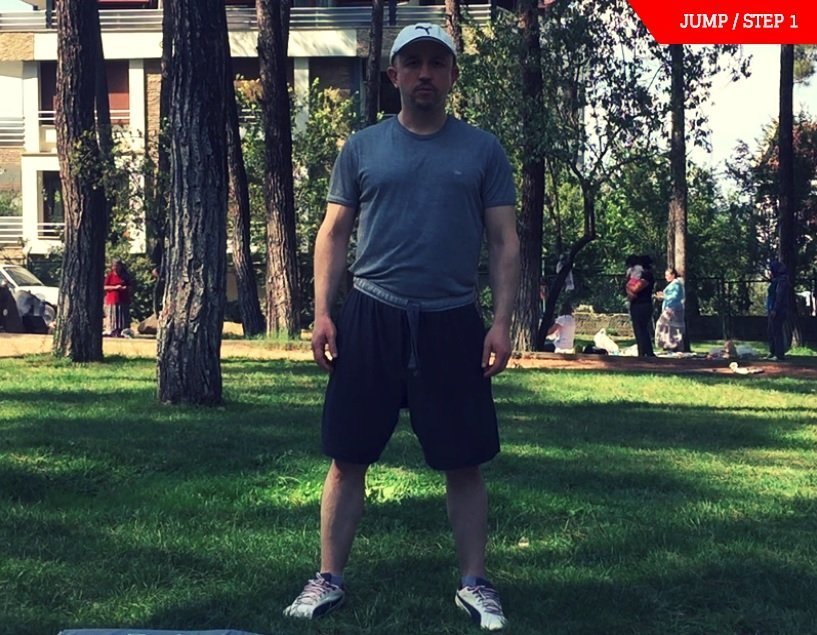
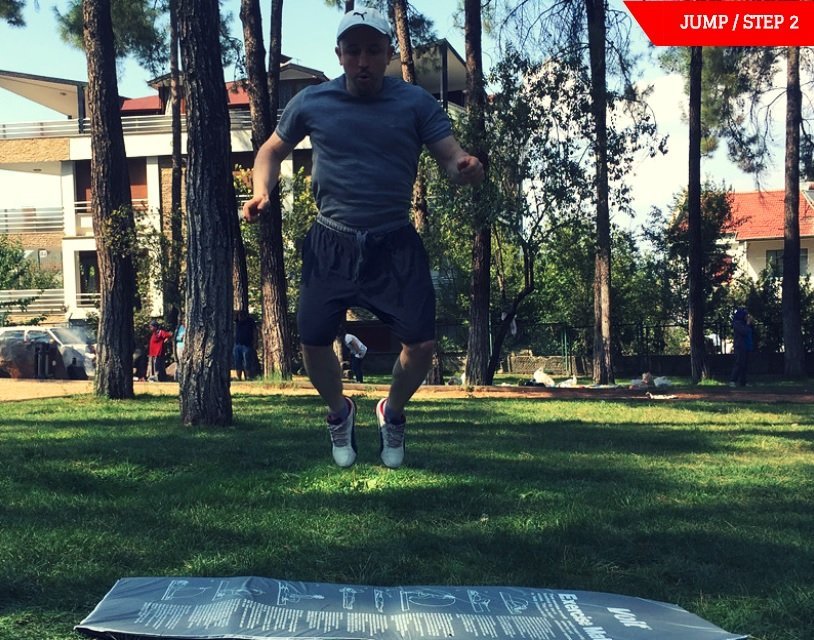
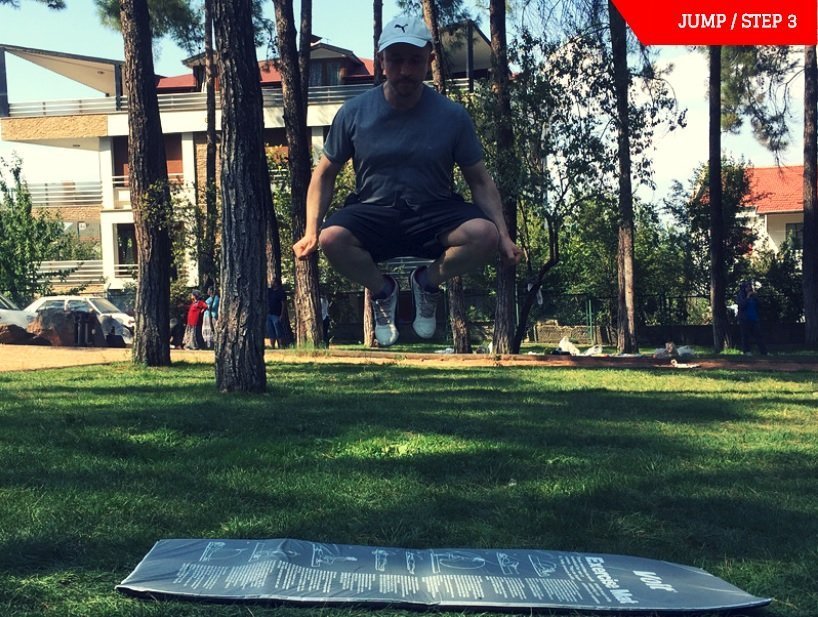
Land on your feet and repeat.
THE EASY VERSION OF THE JUMP (MODIFIED JUMP)
- Start with a standing position with your feet shoulder-width apart
- Jump with both feet at the same time
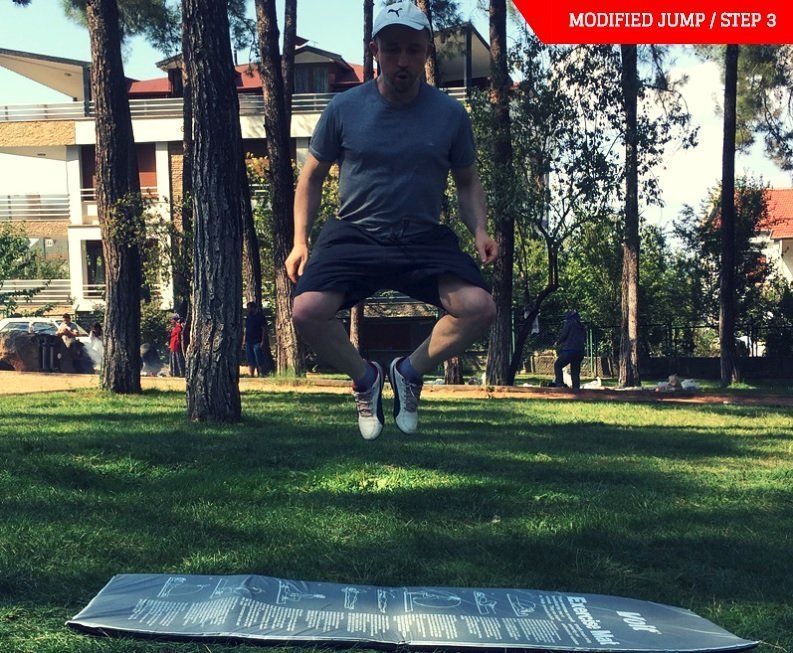
- Raise your knees up until you can’t raise them any longer. Be careful not to turn your knees in.
- Land on your feet to get back to the starting position.
- Repeat
MODIFIED JUMP IN PICTURES
Modified jump is different from the proper jump only at step 3.
CONCLUSION
To build a great physique, these 8 exercises are all the exercises you need. Don’t let their simplicity fool you. They are extremely effective and time-efficient to develop the strong, lean and ripped body you want.
Be sure to read:
- Ripped with Bodyweight: 12-Week Program for Muscle Growth and Fat Loss, Chapter 4: Exercises.
- 13 Reasons Why Every Man Should Do Bodyweight Training
- 20 Life-Changing Benefits of Having Six Pack Abs
- 10 Benefits of Burpees for Building Muscle, Losing Fat, Cardio, and Efficiency
- How to Get Six Pack Abs Fast
- How Long Does It Take To Get Abs?